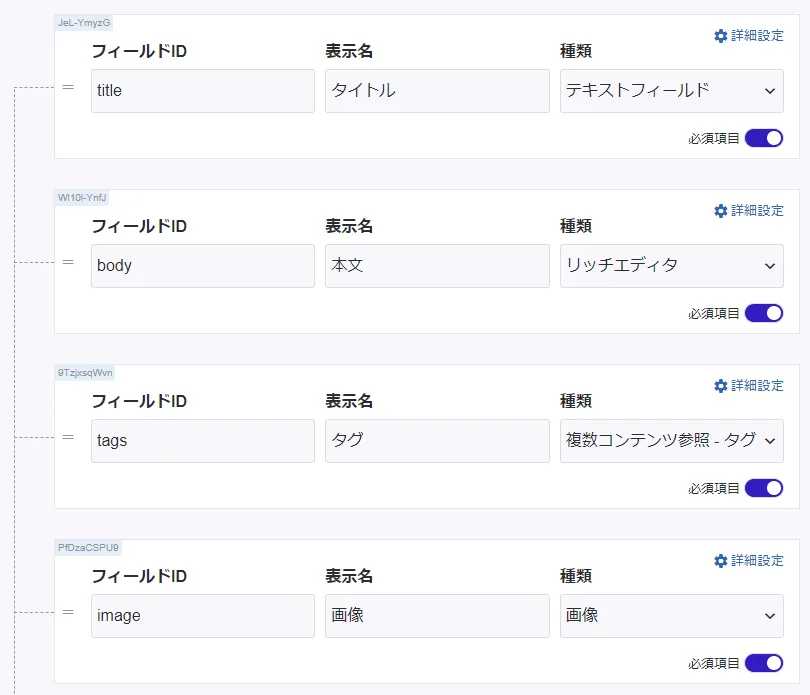
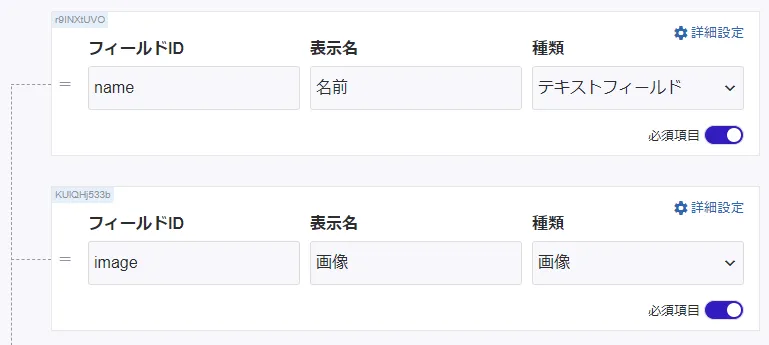
aspidaを導入
インストール
yarn add @aspida/fetch使用するAPIスキーマ
Articles

Tags

型定義ファイルの作成
共通
microCMSのAPIのリクエストとレスポンスで使用する共通の型を作成します。
export type ContentsResponse<T> = { contents: T[] totalCount: number offset: number limit: number}
export type ContentResponse<T> = { id: string createdAt: string updatedAt: string publishedAt: string revisedAt: string} & T
export type ContentsQuery = { draftKey?: string offset?: number limit?: number orders?: string q?: string fields?: string ids?: string filters?: string depth?: number}
export type ContentQuery = { draftKey?: string fields?: string depth?: number}Articles
記事用のレスポンスの型を作成します。
import { ContentsResponse } from './api'import { TagResponse } from './tag'import { ImageResponse } from './image'
export type ArticlesResponse = ContentsResponse<ArticleResponse>
export type ArticleResponse = ContentResponse<{ title?: string body?: string tags?: TagResponse[] image?: ImageResponse}>タグと画像用の型も作成します。
import { ContentResponse, ContentsResponse } from './api'import { ImageResponse } from './image'
export type TagsResponse = ContentsResponse<TagResponse>
export type TagResponse = ContentResponse<{ name?: string image?: ImageResponse}>
src / types / image.tsexport type ImageResponse = { url?: string height?: number width?: number}aspidaの設定
プロジェクトルートに aspida.config.js を作成します。
module.exports = { input: 'src/apis',}aspida用の型定義ファイルを作成します。
import { ContentsQuery } from 'src/types/api'import { ArticlesResponse } from 'src/types/article'
export type Methods = { get: { query?: ContentsQuery resBody: ArticlesResponse }}import { ContentQuery } from 'src/types/api'import { ArticleResponse } from 'src/types/article'
export type Methods = { get: { query?: ContentQuery resBody: ArticleResponse }}$api.tsを生成
package.json の scripts に “api:build”: “aspida” を追加します。
"scripts": { "dev": "next dev", "build": "next build", "start": "next start", "api:build": "aspida" }yarn api:build上記を実行すると、src/apis/$api.ts が生成されます。
APIを叩く
APIを叩く為の共通設定を utils/api.ts に持たせます。
import aspida from '@aspida/fetch'import api from 'src/apis/$api'
const fetchConfig: Required<Parameters<typeof aspida>>[1] = { baseURL: 'https://[YOUR-SERVICE].microcms.io/api/v1/', throwHttpErrors: true, headers: { 'X-API-KEY': '[YOUR-API-KEY]', },}
export const client = api(aspida(fetch, fetchConfig))シンプルにAPIを呼べるようになりました!
import { ArticlesResponse } from 'src/types/article'import { client } from 'src/utils/api'
const response = await client.articles.$get()0件目から、5件取得する場合
const response = await client.articles.$get({ query: { offset: 0, limit: 5, },})IDから1件取得する場合
const id = 'content-id'const response = await client.articles._id(id).$get()